how to take a screenshot on mac?: Complete guide (2023)
It is easier to understand for someone who is not familiar with Mac computers: If you’re new to using a Mac computer and are used to using the Prt Scrn button on a Windows computer. You may be wondering how to take a screenshot on Mac. While it’s not immediately obvious, taking a screenshot on a Mac is actually quite simple once you know how. However, there are different key commands for taking screenshots of windows or smaller selections, and recording video of your screen used to require using a specific program called QuickTime Player. In this guide, you’ll learn how to take screenshots on a Mac and record videos of your screen, as well as some helpful tools to make it easier.
How to Take a Screenshot on Mac: Easy and Quick Guide
As a Mac user, you can easily capture high-quality screenshots of your screen with just a few clicks. Whether you want to share your screen with others or save an important image, here’s how you can take screenshots on your Mac.
1; Capture the Entire Screen:
- To take a screenshot of your entire Mac screen, press and hold Shift + Command + 3. The screenshot will be saved to your desktop automatically.
2; Capture a Portion of the Screen:
- If you only need to capture a specific section of your screen, press and hold Shift + Command + 4. Your cursor will turn into a crosshair. Click and drag your mouse to select the area you want to screenshot. Release the mouse to take the screenshot, which will also be saved to your desktop.
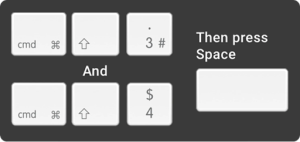
3; Capture a Specific Window:
- To take a screenshot of a specific window on your Mac, press and hold Shift + Command + 4, and then press Space. The crosshair on your cursor will turn into a camera icon. Click on the window you want to capture, and the screenshot will be saved to your desktop.
While the native screenshot tool on your Mac offers you five options, there are also third-party apps available with more options. So, if you’re interested, explore and find the one that works best for you.
With these simple and easy steps, you can capture and save high-quality screenshots on your Mac.
Screenshot menu on Mac For screenshot
Taking screenshots on a Mac is incredibly simple and easy. Depending on your version of macOS, you can either use keyboard shortcuts or access the screenshot menu to capture your screen. In this guide, we’ll cover how to take a screenshot on Mac using the screenshot menu.
Accessing the Screenshot Menu:
- If you’re using macOS Mojave or later, you can access the screenshot menu by pressing Command + Shift + 5. This will bring up the menu where you can choose your desired method of capturing the screen.
Capture Options:
- Within the screenshot menu, you’ll have the option to capture the entire screen, a selected window or portion, and even record your screen. Simply select the desired option to begin capturing your screen.
Additional Settings:
- The screenshot menu also includes an “Options” button that allows you to customize various settings, such as where your screenshots and recordings are saved.
Pre-Mojave Versions:
- If you’re using a version of macOS released before Mojave, you can still take screenshots using dedicated keyboard shortcuts. For example, to capture the entire screen, press Command + Shift + 3, and to capture a selected portion, press Command + Shift + 4.
By following these simple steps, you can easily take screenshots on your Mac and save them for later use. Whether you’re using the screenshot menu or keyboard shortcuts, taking screenshots on a Mac has never been easier.
Print screen of a selected area
Taking a screenshot of a specific area on a Mac is very easy and convenient. All you need to do is press and hold three keys together: Shift, Command, and 4. This will turn your cursor into a crosshair that you can use to select the specific area of the screen that you want to capture.
While selecting the area, you can also press and hold the Space bar to move the selection around. If you change your mind, you can press the Esc key to cancel the screenshot. Once you have selected the desired area, release the mouse or trackpad button to take the screenshot. A thumbnail of the screenshot will appear in the corner of your screen, which you can click on to edit the screenshot or wait until it’s saved to your desktop. With these simple steps, you can easily capture and save any part of your Mac’s screen.
How to Capture a Screenshot of the Whole Screen on Mac?
To take a screenshot of the entire screen on your Mac, follow these steps:
- Press and hold Shift, Command, and 3 simultaneously.
- Wait for the screenshot to save to your desktop. If a thumbnail appears in the corner of your screen, you can also click on it to edit the screenshot.
How to Screenshot a Specific Section or Window on Mac?
To capture a specific section or window on your Mac, follow these steps:
- Open the window or menu that you would like to capture.
- Press and hold Shift, Command, 4, and Space bars simultaneously. The pointer will change to a camera icon.
- Move the camera icon over the window or menu that you want to capture, and click on it. The screenshot will be saved to your desktop.
- If you want to cancel taking the screenshot, hit the Esc (Escape) key.
How to Take Screenshots Using the Touch Bar on Mac?
If you prefer to use a dedicated button for taking screenshots on your Mac, you can create one using the Touch Bar. Here’s how:
- Go to the Apple menu, and select System Preferences > Keyboard.
- Click on Customize Control Strip.
- Choose the location of your screenshot button on the Touch Bar, drag and drop it there, and save the changes.
- Click on the screenshot button on the Touch Bar to bring up the screen capture menu.
- Click “Save To” if you want to change where your screenshots are saved to.
- Choose what you want to capture: the entire screen, selected area, or window.
- Move your cursor to the section or window you want to capture and click on it. The screenshot will be saved to your desktop.
How to print screen on Mac with Preview?
Are you tired of taking screenshots on your Mac and having to switch between multiple applications just to edit them? Luckily, Apple’s native image and PDF viewer, Preview, has a built-in screenshot tool that lets you capture a specific section of the screen, a window, or the entire screen with ease.
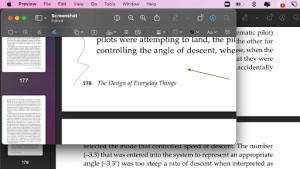
The best part about using Preview for taking screenshots is that it automatically opens the captured image in a new window, so you can make any necessary edits right away. Want to resize the image, add annotations, or crop it? Preview’s got you covered.
So, how do you take a screenshot using Preview?
It’s super easy! Just open the app menu, select “File,” then “Take Screenshot.” Choose which part of the screen you want to capture, and voila! You’ve got a screenshot ready to edit and save to any location on your Mac.
Say goodbye to the hassle of switching between applications just to edit your screenshots. With Preview, you can capture and edit all in one convenient location.
MacOS screenshot organization
Do you find yourself drowning in a sea of generic screenshot file names, cluttering up your Downloads folder or Desktop? It can be frustrating to keep track of them all, especially when macOS abbreviates file names to the point of being unrecognizable.
Luckily, there is a solution: PhotoBulk, a bulk image editor designed to rename, resize, and compress photos in batches. With PhotoBulk, you can easily organize your screenshots by creating a custom name for the entire group. Just drag and drop the screenshots you want to rename, type in the new name, and click “Start.” Voila! All of your screenshots will be neatly organized into their own folder.
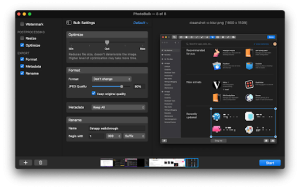
But that’s not all! PhotoBulk also allows you to resize and watermark your images, making it a great tool for photographers or anyone who needs to edit images on a regular basis. And with the ability to customize the exact format of your image names and choose the starting number for your image count, PhotoBulk offers a level of flexibility that is hard to beat.
Embrace the Joy of Organization: Experience the joy of a neatly organized image library as PhotoBulk transforms the way you manage and move google photos to onedrive.
Say goodbye to the chaos of poorly named screenshots cluttering up your Mac. Try PhotoBulk today and experience the joy of a neatly organized image library.
How to share Apple screenshots?
Sharing your Mac screenshots with others can be a hassle, especially if you have to resort to emailing files or uploading them to a public drive. But there is a solution: Dropshare. This tool allows you to easily share screenshots (and other files) by simply dropping them into the relevant area.

Dropshare even integrates with major third-party cloud apps, or you can use the proprietary Dropshare Cloud if you want to keep your Mac screen capture sharing separate from other sharing activities. With Dropshare, you can quickly and securely share your screenshots with colleagues, friends, or anyone else who needs to see them.
Third-party macOS screenshot apps
Taking screenshots on a Mac is a useful feature for capturing and sharing information. However, the built-in macOS screenshot tool may not always be enough. This is where third-party screenshot apps come in handy. In this note, we will cover three third-party macOS screenshot apps that can help with screen recording, annotating, editing, and sharing: CleanShot X, Capto, and Yac. We will also touch upon how advanced media players can be used for taking screenshots.
Third-Party macOS Screenshot Apps
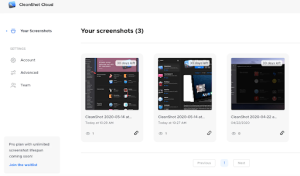
CleanShot X
CleanShot X is a third-party macOS screenshot app that offers more features than the built-in macOS screenshot tool. It allows you to take screenshots and screen recordings, annotate them, and edit them with ease. CleanShot X also offers a built-in file organizer that helps you keep track of your screenshots. This app is ideal for those who frequently take screenshots and need more advanced editing tools.
Capto
Capto is another third-party macOS screenshot app that focuses more on the on-screen recording. In addition to recording video or taking a snapshot, Capto also allows you to annotate and edit captures in an intuitive iMovie-esque interface. This app is great for recording video tutorials and adding captions instead of a voiceover. Capto’s built-in organizer is also helpful for keeping track of your screenshots.
Yac
Yac is a third-party macOS screenshot app that offers a quick way to share information with your colleagues without distracting them with calls. It is an asynchronous voice and video messaging tool that allows you to record a quick voice message, add a screen recording with annotations, and show your webcam. Your teammates can check out the message when it’s convenient for them. Yac can also be integrated with Slack, so you get notified when someone sends you a message.
Advanced Media Players
Many advanced media players, such as Elmedia Player, also have a screenshot tool. This is useful for capturing specific moments in a movie or video. When you watch a movie online, most streaming services block screenshot tools. Instead, you can use Elmedia Player to play any media content and capture screenshots on the fly.
Third-party macOS screenshot apps offer more advanced features than the built-in macOS screenshot tool. CleanShot X, Capto, and Yac are three such apps that can help with screen recording, annotating, editing, and sharing. Additionally, advanced media players like Elmedia Player can be used for taking screenshots while watching movies or videos.
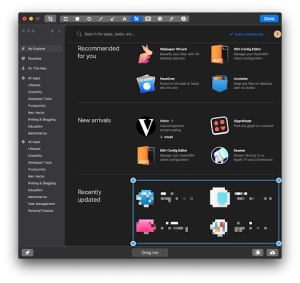
Using Setapp for Screenshotting on Mac
Setapp is a membership service that provides access to over 240 essential apps for any task at hand. One of the many benefits of Setapp is that it offers a variety of screenshot apps to choose from. In this guide, we’ll show you how to use Setapp to find and use the best screenshot app for your Mac.
1: Sign up for Setapp Membership
To start using Setapp, go to their website and sign up for a membership. You can start with a 7-day free trial to test out all the apps, including the screenshot apps mentioned in this article.
2: Choose a Screenshot App
Once you’re signed up, you can browse through the 240+ apps in the Setapp library to find a screenshot app that suits your needs. Some of the recommended apps for screenshotting include CleanShot X, Capto, and Elmedia Player.
3: Install the App
Once you’ve selected an app, click on the “Install” button to download and install it on your Mac.
4: Use the Screenshot App
Open the screenshot app and start using it to take screenshots. For example, with CleanShot X, you can capture scrolling content, hide desktop clutter and disable desktop notifications, add annotations, blur specific parts, or draw. You can also use its self-timer and screenshot pinning features.
Step 5: Explore Other Setapp Apps
While you’re at it, don’t hesitate to explore other Setapp apps for various other tasks. With Setapp, you have access to a wide range of apps that can help you with productivity, creativity, organization, and more.
Setapp provides a convenient way to access a variety of screenshot apps for your Mac. By following these simple steps, you can easily find and use the best screenshot app for your needs.
Conclusion:
How to Take Screenshots on Mac with Ease?
Learning how to take a screenshot on Mac is a relatively straightforward process, with several built-in options available on your MacBook. From taking a screenshot of the entire screen to selecting a specific area or window, macOS offers a variety of ways to capture what you need.
However, if you need more advanced features like scrolling captures or annotation tools, third-party snipping tools like CleanShot X, Capto, and Yac can provide a more customized solution. Additionally, tools like PhotoBulk and Dropshare can help you organize and share your screenshots with ease.
Overall, while the process of how to take a screenshot on mac is already quite simple, the variety of options available means that you can find the right solution for your specific needs. And as Apple continues to improve and update macOS, we can expect even more streamlined and user-friendly options in the future.
2 thoughts on “how to take a screenshot on mac?: Complete guide (2023)”